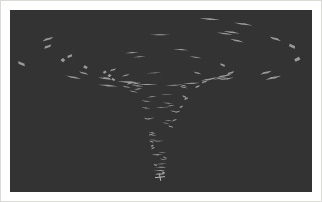
After the cyclone above builds out, click and drag the small rotating plus sign to direct the storm. The Cyclone example uses the classes from the Chapter 14 Penner AS2 post.
To replicate this example:
- Create a new Flash movie and then create a new Graphic named “particleGraphic”.
- Inside the Graphic, add a square 10px wide by 10px high. Rotate the square 45 degrees and then resize it to 3px wide by 11px high, x and y position at 0.
- Outside the Graphic, select it on the Stage, center it over the registration point, give it a tint of 153, 153, 153, and convert it to a MovieClip so that the Graphic is now within a MovieClip. Name this MovieClip “Particle” and give it an instance name of “particle”.
- Select this MovieClip on the stage and convert it to another MovieClip. Name this clip “CyclonePath” and add the class linkage of “com.robertpenner.profmx.cyclone.CyclonePath”. Also, give it an instance name of “path”.
- Within the CyclonePath MovieClip, add a layer above the particle named “actions” and put the following code:
1this.init();
- Back outside of the CyclonePath MovieClip, convert it to another MovieClip. Name this clip “CycloneOval” and add the class linkage of “com.robertpenner.profmx.cyclone.CycloneOval”.
- Within the CycloneOval MovieClip, add a layer above the path named “actions” and put the following code:
1this.init();
- Close all of these MovieClips and create a new MovieClip named “CycloneDragger” with a class linkage of “com.robertpenner.profmx.cyclone.CycloneDragger”.
- Within this MovieClip, add a 1px wide by 28px high line centered over the registration point. Duplicate this line and rotate it 90 degrees so you end up having crosshairs. Convert the crosshairs to a graphic named “crosshairs”.
- Outside of the crosshairs graphic, within the CycloneDragger MovieClip, give the crosshairs graphic an alpha of 65% and scale it to 70%. Add a new layer with a fully transparent oval centered over the registration point and crosshairs, 28px wide by 39px high. This will be used as the button for the dragger.
- Outside of the CycloneDragger MovieClip, scale the clip to 35%, centered over the registration point horizontally, and vertically placed at 106 with an instance name of “p0”.
- Convert the CycloneDragger MovieClip to a new MovieClip named “Cyclone” with a class linkage of “com.robertpenner.profmx.cyclone.Cyclone”.
- You will now convert this Cyclone MovieClip to a component. Right-click on it in the library and select “Component Definition”. In the window that pops up add the same class to the area that says “AS 2.0 Class:”.
- Give the Cyclone component that is currently on the stage an instance name of “cyclone” and scale it to 150% wide by 110% high and center it on the Stage so that both the registration point and dragger can be seen. Click on the Parameters tab to see the following component options: funnelHeight, maxParticles, speed, and stiffness. Play around with these options.
- On the root timeline add the following code and compile:
1this.cyclone.init();

Great Work! I wish adobe would implement this type of classes that you have done. Again keeep it up. great stuff!
Amazing work my friend!